ここで紹介しているカスタマイズ方法は、カスタマイズにご興味のあるお客様への参考資料として紹介するものです。
この記事の内容は TeamPage 6.2.45 と CRM 1.1.1 を元に作成してありますが、異なるバージョンでは正しく動作しない倍があります。
また、カスタマイズに関するご質問は承っておりますが、お客様が行うカスタマイズ内容そのものはサポート対象外(動作保証外)ですのでご注意ください。
当社によるお客様専用のカスタマイズも承っておりますので、お気軽にご相談ください。
display_name= と name= を変更します。
display_name=#{@crm#plugin_display_name} (Custom Version)

#
# (中略)
#

name=jp.co.example.crm
"crm_goal": {
  "__inherits": "goal",
  "display_name": "#{@crm#crm_goal_form_display_name}",
  "schema_elements": "project,title,property_due,status,color,content,attachments,property_crm_subject,crm_goal_rank,crm_goal_stage,property_crm_goal_inquiry,property_crm_budget,property_crm_budget_digitonly,property_crm_sales_revenue,property_crm_sales_revenue_digitonly,property_crm_gross_profit,property_crm_gross_profit_digitonly,crm_connects_goal_with_company,crm_connects_goal_with_contact,property_owners,property_members,tags,property_crm_goal_show_burnupchart,property_goal_dashboard_milestones_max,property_edit_desc,property_crm_first_letter,property_crm_goal_initiator",
  "form_title": "#{@crm#crm_goal_form_title}",
  "form_class": "project-dialog crm-dialog crm-goal-dialog",
  "form_save": "#{@crm#crm_goal_form_save}",
  "field_title_value": "[[ /token crm_goal_title ]]",
  "field_title_visible": "false",
  "field_property_crm_subject_required": "true",
  "field_crm_connects_goal_with_company_focus": "true",
  "field_property_crm_subject_description": "#{@crm#field_property_crm_subject_description}",
  "field_crm_connects_goal_with_contact_required": "false",
  "field_crm_connects_goal_with_contact_description": "",
  "field_crm_connects_goal_with_company_required": "false",
  "field_crm_connects_goal_with_company_description": "",
  "field_property_crm_goal_show_burnupchart_label": "#{@crm#field_property_crm_goal_show_burnupchart_label}",
  "field_property_goal_dashboard_milestones_max_label": "#{@crm#field_property_goal_dashboard_milestones_max_label}",
  "field_property_goal_dashboard_milestones_max_description": "#{@crm#field_property_goal_dashboard_milestones_max_description}",
  "field_property_crm_rank_label_name_bucket": "crm_goal_rank",
  "field_project_tabindex": "100",
  "field_goal_tabindex": "101",
  "field_milestone_tabindex": "102",
  "field_crm_connects_goal_with_company_tabindex": "1001",
  "field_crm_connects_goal_with_contact_tabindex": "1002",
  "field_property_crm_subject_tabindex": "1003",
  "field_property_due_tabindex": "1004",
  "field_color_tabindex": "1005",
  "field_crm_goal_rank_tabindex": "1006",
  "field_property_crm_goal_inquiry_tabindex": "1007",
  "field_crm_goal_stage_tabindex": "1008",
  "field_status_tabindex": "1009",
  "field_property_crm_budget_tabindex": "1010",
  "field_property_crm_sales_revenue_tabindex": "1011",
  "field_property_crm_gross_profit_tabindex": "1012",
  "field_content_tabindex": "1013",
  "field_attachments_tabindex": "1014",
  "field_tags_tabindex": "1015",
  "field_property_owners_tabindex": "1016",
  "field_property_members_tabindex": "1017",
  "field_property_crm_goal_show_burnupchart_tabindex": "1018",
  "field_property_goal_dashboard_milestones_max_tabindex": "1019",
  "field_property_edit_desc_tabindex": "1020",
  "sdl": "com.traction.sdl.crm.forms#goal",
  "entry_content_prepend": "[[ /token crm_goal_info ]]",
  "entry_content_append": "[[ /token crm_goal_info_more ]]",
  "entry_class": "crm_goal"
}
schema_elements= は、フォームで利用可能な部品の名前を指定します。schema_elements= に追加したい部品の名前を追加します。schema_elements= は次のようになります。
"schema_elements": "project,title,property_due,status,color,content,attachments,property_crm_subject,crm_goal_rank,crm_goal_stage,property_crm_goal_inquiry,property_crm_budget,property_crm_budget_digitonly,property_crm_sales_revenue,property_crm_sales_revenue_digitonly,property_crm_gross_profit,property_crm_gross_profit_digitonly,crm_connects_goal_with_company,crm_connects_goal_with_contact,property_owners,property_members,tags,property_crm_goal_show_burnupchart,property_goal_dashboard_milestones_max,property_edit_desc,property_crm_first_letter,property_crm_goal_initiator,crm_contract_type,crm_mfr,property_crm_maint_fee,property_crm_maint_due",
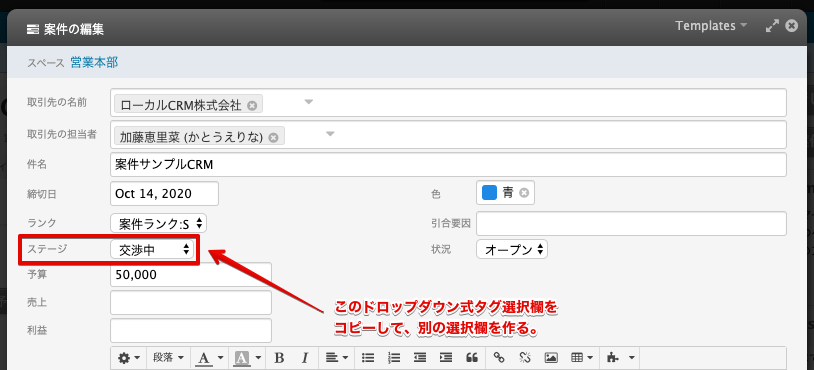
"crm_goal_stage": {
  "type": "labelname_bucket_select",
  "entry_field": "crm_goal_stage"
},
"crm_contract_type": {
  "type": "labelname_bucket_select",
  "entry_field": "crm_contract_type"
},
"crm_mfr": {
  "type": "labelname_bucket_select",
  "entry_field": "crm_mfr"
},
type の値は labelname_bucket_select になります。これは、「この部品のタイプ(種類)は、タグの選択欄です」という意味です。entry_field は、この部品を使って入力された値を表示するときの部品名を指定します。フォーム上で「入力」につかう部品と、記事に「出力」する部品とが分かれており、「この部品を使って入力された内容はこの部品を使って表示できます」という設定を行います。通常、タグ選択式の部品は、入力と出力とで同じ名前を使います。
"crm_goal_stage": {
  "class": "com.traction.sdk.token.LabelNameBucketEntryField",
  "label_name_bucket": "crm_goal_stage",
  "filter_selectable": "true",
  "filter_group": "crm_goal",
  "filter_order": "5030",
  "display_name": "#{@crm#property_crm_stage_label}"
},
"crm_contract_type": {
  "class": "com.traction.sdk.token.LabelNameBucketEntryField",
  "label_name_bucket": "crm_contract_type",
  "filter_selectable": "true",
  "filter_group": "crm_goal",
  "filter_order": "5030",
  "display_name": "Contract Type"
},
"crm_mfr": {
  "class": "com.traction.sdk.token.LabelNameBucketEntryField",
  "label_name_bucket": "crm_mfr",
  "filter_selectable": "true",
  "filter_group": "crm_goal",
  "filter_order": "5030",
  "display_name": "MFR"
},
"config/entry/fields/html": {
  "crm_goal_stage": {
    "sdl": "com.traction.sdl.fields.html#entry-labelname-bucket-value"
  },
  "crm_contract_type": {
    "sdl": "com.traction.sdl.fields.html#entry-labelname-bucket-value"
  },
  "crm_mfr": {
    "sdl": "com.traction.sdl.fields.html#entry-labelname-bucket-value"
  },
},

// 省略

"config/entry/fields/text": {
  "crm_goal_stage": {
    "sdl": "com.traction.sdl.fields.text#entry-labelname-bucket-value"
  },
  "crm_contract_type": {
    "sdl": "com.traction.sdl.fields.text#entry-labelname-bucket-value"
  },
  "crm_mfr": {
    "sdl": "com.traction.sdl.fields.text#entry-labelname-bucket-value"
  },
},
"sdl": "com.traction.sdl.fields.text#entry-labelname-bucket-value"
com.traction.sdl.fields.text#entry-labelname-bucket-value は、「com フォルダの中の、traction フォルダの中の、sdl フォルダの中の、fields フォルダの中の、text.sdl ファイルの中の entry-labelname-bucket-value 関数を使って、エントリーフィールドを表示しなさい」という意味になります。label_name_bucket の行がありました。
"config/data/labelnamebuckets": {

  // 省略

  "crm_goal_stage": {
    "class": "tsi.sdk.data.DynamicSettingValueLabelNameBucket",
    "store_type": "journal",
    "property_name": "crm_goal_stage"
  },
  "crm_contract_type": {
    "class": "tsi.sdk.data.DynamicSettingValueLabelNameBucket",
    "store_type": "journal",
    "property_name": "crm_contract_type"
  },
  "crm_mfr": {
    "class": "tsi.sdk.data.DynamicSettingValueLabelNameBucket",
    "store_type": "journal",
    "property_name": "crm_mfr"
  },

  // 省略

},
class で指定されている tsi.sdk.data.DynamicSettingValueLabelNameBucket は、「このラベル選択部品は、サーバー管理者がドロップダウンの選択肢を設定できるタイプです」という意味です。store_type で、そのサーバー管理者用の設定が、プラグイン設定画面の「ジャーナル設定」欄に表示されるように、journal の値を指定しています。property_name は設定の名前です。
"crm_goal": {
  "__inherits": "goal",
  "display_name": "#{@crm#entry_class_crm_goal_display_name}",
  "newentry_form": "crm_goal",
  "editentry_form": "crm_goal",
  "editentry_singleentry_form": "crm_goal",
  "prefer_custom_entry_type": "false",
  "custom_entry_type": "goal",
  "newentry_link_text": "#{@crm#entry_class_crm_goal_newentry_link_text}",
  "editentry_link_text": "#{@crm#entry_class_crm_goal_editentry_link_text}",
  "labelname_buckets": "tags,todo,crm_goal_rank,crm_goal_stage",
  "reference_buckets": "crm_connects_goal_with_contact,crm_connects_goal_with_company",
  "diffsdl": "com.traction.sdl.crm.diff#goal"
}
"labelname_buckets": "tags,todo,crm_goal_rank,crm_goal_stage",
"labelname_buckets": "tags,todo,crm_goal_rank,crm_goal_stage,crm_contract_type,crm_mfr",
"config/settings/props/journal": {

// 省略

  "crm_goal_stage": {
    "class": "tsi.sdk.settings.LabelNameBucketData",
    "display_name": "#{@crm#crm_goal_stage_display_name}",
    "description": "#{@crm#crm_goal_stage_description}",
    "tip": "#{@crm#crm_goal_stage_tip}",
    "sdleditor": "com.traction.sdl.admin.settings#labelname-bucket",
    "edit_type": "false",
    "edit_name": "false",
    "edit_display_name": "true",
    "labelname_list_size": "50",
    "usedefault": "true",
    "default": "type=list,name=crm_goal_stage,display_name=#{@crm#crm_goal_stage_list_display_name},list=#{@crm#crm_goal_stage_list_opt1}\\,#{@crm#crm_goal_stage_list_opt2}\\,#{@crm#crm_goal_stage_list_opt3}\\,#{@crm#crm_goal_stage_list_opt4}\\,#{@crm#crm_goal_stage_list_opt5}\\,#{@crm#crm_goal_stage_list_opt6}",
    "bucket_name": "crm_goal_stage"
  },
  "crm_contract_type": {
    "class": "tsi.sdk.settings.LabelNameBucketData",
    "display_name": "Contract Type Tag Group",
    "description": "Please fill-in tag names that will be used as the contract types.",
    "tip": "Each must be comma-separated.",
    "sdleditor": "com.traction.sdl.admin.settings#labelname-bucket",
    "edit_type": "false",
    "edit_name": "false",
    "edit_display_name": "true",
    "labelname_list_size": "50",
    "usedefault": "true",
    "default": "type=list,name=crm_contract_type,display_name=Contract Type,list=",
    "bucket_name": "crm_contract_type"
  },
  "crm_mfr": {
    "class": "tsi.sdk.settings.LabelNameBucketData",
    "display_name": "Manufacturer Tag Group",
    "description": "Please fill-in tag names that will be used as the manufacturer names.",
    "tip": "Each must be comma-separated.",
    "sdleditor": "com.traction.sdl.admin.settings#labelname-bucket",
    "edit_type": "false",
    "edit_name": "false",
    "edit_display_name": "true",
    "labelname_list_size": "50",
    "usedefault": "true",
    "default": "type=list,name=crm_mfr,display_name=Manufacturer,list=",
    "bucket_name": "crm_mfr"
  },

// 省略

}
db_settings= に crm_contract_type と crm_mfr を追加します。
db_settings=crm_locale,crm_preferred_post_project,crm_contact_title_format,crm_contact_use_pagenames,crm_company_use_pagenames,crm_contact_index_view_entry_format,crm_subtabs_allprojects,crm_subtab_companies_table_text,crm_subtab_contacts_table_text,crm_subtab_goals_table_text,crm_subtab_companies_feed_text,crm_subtab_contacts_feed_text,crm_subtab_goals_feed_text,crm_subtab_overview_text,crm_show_addmenu_allprojects,crm_show_addmenu_userprofile,crm_company_cat,crm_company_rank,crm_goal_rank,crm_goal_stage,crm_company_datatables_fields,crm_company_datatables_orderindex,crm_contact_datatables_fields,crm_contact_datatables_orderindex,crm_goal_datatables_fields,crm_goal_collapse_dashboard_info,crm_contract_type,crm_mfr
"config/data/field/props": {

  // 省略

    "property_crm_maint_fee": {
      "type": "number",
      "entry_field": "crm_maint_fee",
      "class": "maint_fee"
    },

  // 省略

},
"crm_maint_fee": {
  "class": "com.traction.sdk.token.EntryPropertyEntryField",
  "display_name": "Maintenance Fee",
  "diff_value_format_sdl": "com.traction.sdl.token.feedsummary#format-generic",
  "filter_selectable": "false"
},
"config/entry/fields/html": {

  // 省略

  "crm_maint_fee": {
    "sdl": "com.traction.sdl.fields.html#entry-property-value"
  },

  // 省略

},

// 省略

"config/entry/fields/text": {

  // 省略

  "crm_maint_fee": {
    "sdl": "com.traction.sdl.fields.text#entry-property-value"
  },

  // 省略

},
"config/data/field/props": {

  // 省略

    "property_crm_maint_due": {
      "type": "date",
      "entry_field": "crm_maint_due",
      "class": "maint_due"
    },

  // 省略

},
"config/entry/classes": {
  "crm_goal": {

    // 省略

    "standard_date_crm_maint_due_entry_property_name": "crm_maint_due",
    "standard_date_crm_maint_due_allday_entry_property_name": "crm_maint_due_allday",
    "standard_date_crm_maint_due_allday_entry_property_default": "true"

  }
}
"config/entry/fields/props": {

  // 省略

  "crm_maint_due": {
    "class": "com.traction.sdk.token.EntryStandardDateEntryField",
    "display_name": "Maint  Due",
    "date_name": "crm_maint_due",
    "diff_value_format_sdl": "com.traction.sdl.token.feedsummary#format-due",
    "filter_selectable": "false"
  },

  // 省略

},
"config/entry/fields/html": {

  // 省略

  "crm_maint_due": {
    "sdl": "com.traction.sdl.fields.html#entry-standard-date"
  },

  // 省略

},

// 省略

"config/entry/fields/text": {

  // 省略

  "crm_maint_due": {
    "sdl": "com.traction.sdl.fields.text#entry-standard-date"
  },

  // 省略

},
"config/data/forms": {

  "crm_goal": {
    // 省略

    //"sdl": "com.traction.sdl.crm.forms#goal",
    "sdl": "",

    // 省略
  }

},
<sdl.function name="goal-rows">
  <fm#row-1col rowClass="fm-row" field="crm_connects_goal_with_company" colspan="3" />
  <fm#row-1col rowClass="fm-row" field="crm_connects_goal_with_contact" colspan="3" />
  <fm#row-1col rowClass="fm-row" field="property_crm_subject" colspan="3" />
  <fm#row-2col fieldName1="property_due" class1="due" fieldName2="color" class2="color" />
  <fm#row-2col fieldName1="crm_goal_rank" class1="rank" fieldName2="property_crm_goal_inquiry" class2="inquiry" />
  <fm#row-2col fieldName1="crm_goal_stage" fieldName2="status" />
  <fm#row-2col rowClass="budget" fieldName1="property_crm_budget" />
  <fm#row-2col rowClass="revenue" fieldName1="property_crm_sales_revenue" />
  <fm#row-2col rowClass="profit" fieldName1="property_crm_gross_profit" />
  <fm#row-1col rowClass="fm-row" field="content" class="vtop" colspan="3" />
  <fm#row-1col rowClass="fm-row" fieldName1="tags" class1="g" fieldName2="attachments" colspan="3" />
  <fm#row-1col rowClass="fm-row" field="property_owners" class="u" colspan="3" />
  <fm#row-1col rowClass="fm-row" field="property_members" class="u" colspan="3" />
  <fm#row-1col rowClass="fm-row" field="property_crm_goal_show_burnupchart" class="m" colspan="3" />
  <fm#row-1col rowClass="fm-row" field="property_goal_dashboard_milestones_max" class="m" colspan="3" />
  <fm#row-edit-description />
</sdl.function>
rowClass= は指定してもしなくても構いません。
<fm#row-1col rowClass="行クラス名" field="部品の名前" colspan="3" />
rowClass=, class1=, class2= は指定しなくても構いません。
<fm#row-2col rowClass="行クラス名" fieldName1="部品名(1)" class1="部品(1)のクラス名" fieldName2="部品名(2)" class2="部品(2)のクラス名" />
<sdl.function name="goal-rows">
<fm#row-1col rowClass="fm-row" field="crm_connects_goal_with_company" colspan="3" />
<fm#row-1col rowClass="fm-row" field="crm_connects_goal_with_contact" colspan="3" />
<fm#row-1col rowClass="fm-row" field="property_crm_subject" colspan="3" />
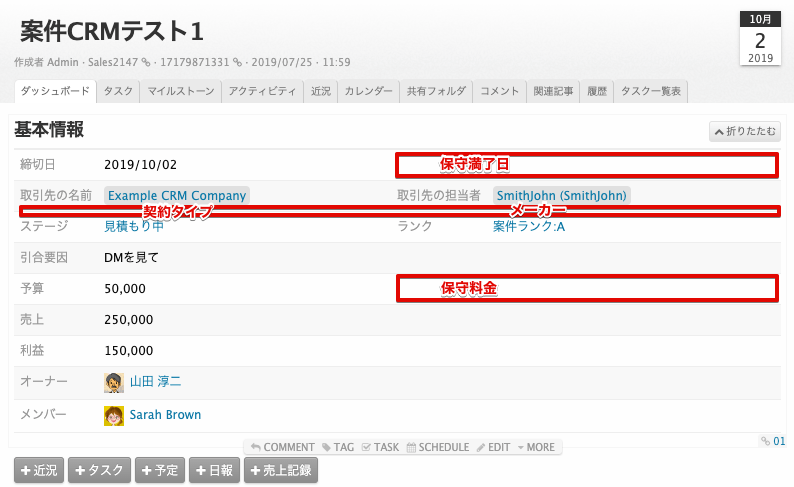
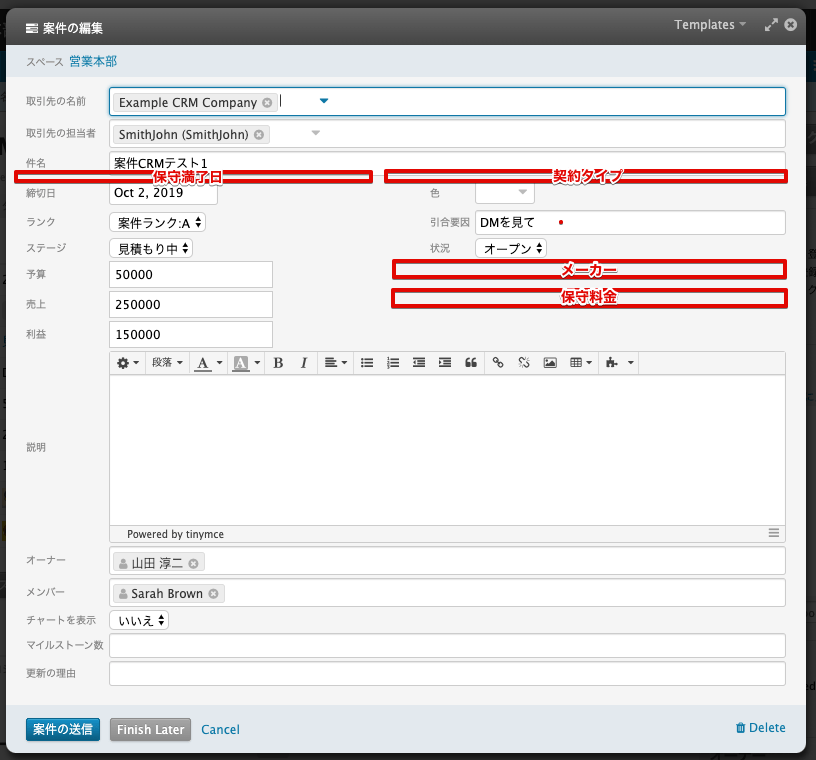
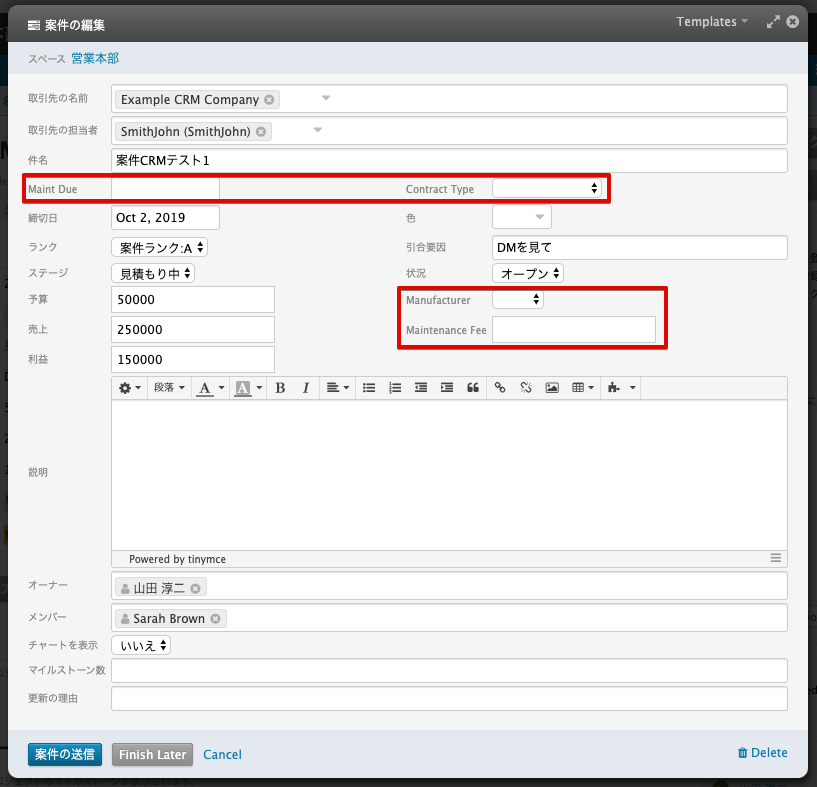
<!--- ここに「保守満了日」と「契約タイプ」フィールドを表示 -->
<fm#row-2col rowClass="fm-row" fieldName1="property_crm_maint_due" fieldName2="crm_contract_type" />
<fm#row-2col fieldName1="property_due" class1="due" fieldName2="color" class2="color" />
<fm#row-2col fieldName1="crm_goal_rank" class1="rank" fieldName2="property_crm_goal_inquiry" class2="inquiry" />
<fm#row-2col fieldName1="crm_goal_stage" fieldName2="status" />
<!--- 「予算」の右側に「メーカー」フィールドを表示 -->
<fm#row-2col rowClass="budget_mfr" fieldName1="property_crm_budget" fieldName2="crm_mfr" />
<!--- 「売上」の右側に「保守料金」フィールドを表示 -->
<fm#row-2col rowClass="revenue_maint_due" fieldName1="property_crm_sales_revenue" fieldName2="property_crm_maint_fee" />
<fm#row-2col rowClass="profit" fieldName1="property_crm_gross_profit" />
<fm#row-1col rowClass="fm-row" field="content" class="vtop" colspan="3" />
<fm#row-1col rowClass="fm-row" fieldName1="tags" class1="g" fieldName2="attachments" colspan="3" />
<fm#row-1col rowClass="fm-row" field="property_owners" class="u" colspan="3" />
<fm#row-1col rowClass="fm-row" field="property_members" class="u" colspan="3" />
<fm#row-1col rowClass="fm-row" field="property_crm_goal_show_burnupchart" class="m" colspan="3" />
<fm#row-1col rowClass="fm-row" field="property_goal_dashboard_milestones_max" class="m" colspan="3" />
<fm#row-edit-description />
</sdl.function>
<sdl.function name="crm-goal-info-table">
  <div class="crm-goal-info-container">
    <table class="crm-goal-info">
      <#row-2cols rowClass="due" fieldName1="due" type1="due" />
      <tr class="company-contact">
        <td class="company l td1"><i></i>#{@crm#crm_connects_goal_with_company_label}</dt>
        <td class="company v td2"><#crm-related-entries direction="outgoing" verb="::*:response:relates" search="x(crm_company)"><#entry-title-and-link /></#crm-related-entries></dd>
        <td class="contact l td3"><i></i>#{@crm#crm_connects_goal_with_contact_label}</dt>
        <td class="contact v td4"><#crm-related-entries direction="outgoing" verb=":*:response:relates" search="x(crm_contact)"><#entry-title-and-link /></#crm-related-entries></dd>
      </tr>
      <#row-2cols rowClass="stage_rank" fieldName1="crm_goal_stage" type1="filtered_feed" fieldName2="crm_goal_rank" type2="filtered_feed" />
      <#row-2cols rowClass="inquiry" fieldName1="crm_goal_inquiry" type1="filtered_feed" />
      <#row-2cols rowClass="budget" fieldName1="crm_budget" type1="accounting" />
      <#row-2cols rowClass="revenue" fieldName1="crm_sales_revenue" type1="accounting" />
      <#row-2cols rowClass="profit" fieldName1="crm_gross_profit" type1="accounting" />
      <#row-owners />
      <#row-members />
    </table>
  </div>
</sdl.function>
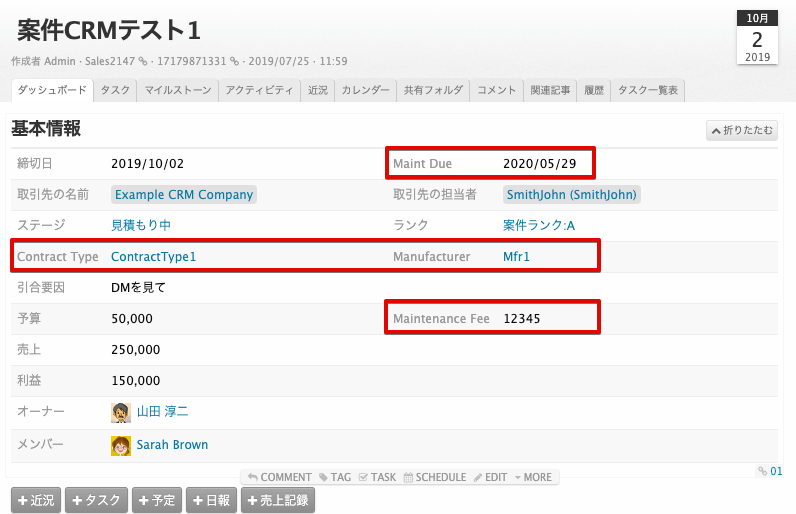
<sdl.function name="crm-goal-info-table">
  <div class="crm-goal-info-container">
    <table class="crm-goal-info">
      <#row-2cols rowClass="due" fieldName1="due" type1="due" fieldName2="crm_maint_due" type2="due" />
      <tr class="company-contact">
        <td class="company l td1"><i></i>#{@crm#crm_connects_goal_with_company_label}</dt>
        <td class="company v td2"><#crm-related-entries direction="outgoing" verb="::*:response:relates" search="x(crm_company)"><#entry-title-and-link /></#crm-related-entries></dd>
        <td class="contact l td3"><i></i>#{@crm#crm_connects_goal_with_contact_label}</dt>
        <td class="contact v td4"><#crm-related-entries direction="outgoing" verb=":*:response:relates" search="x(crm_contact)"><#entry-title-and-link /></#crm-related-entries></dd>
      </tr>
      <#row-2cols rowClass="stage_rank" fieldName1="crm_goal_stage" type1="filtered_feed" fieldName2="crm_goal_rank" type2="filtered_feed" />
      <#row-2cols rowClass="contract_type_mfr" fieldName1="crm_contract_type" type1="filtered_feed" fieldName2="crm_mfr" type2="filtered_feed" />
      <#row-2cols rowClass="inquiry" fieldName1="crm_goal_inquiry" type1="filtered_feed" />
      <#row-2cols rowClass="budget_maint_fee" fieldName1="crm_budget" type1="accounting" fieldName2="crm_maint_fee" type="accounting" />
      <#row-2cols rowClass="revenue" fieldName1="crm_sales_revenue" type1="accounting" />
      <#row-2cols rowClass="profit" fieldName1="crm_gross_profit" type1="accounting" />
      <#row-owners />
      <#row-members />
    </table>
  </div>
</sdl.function>
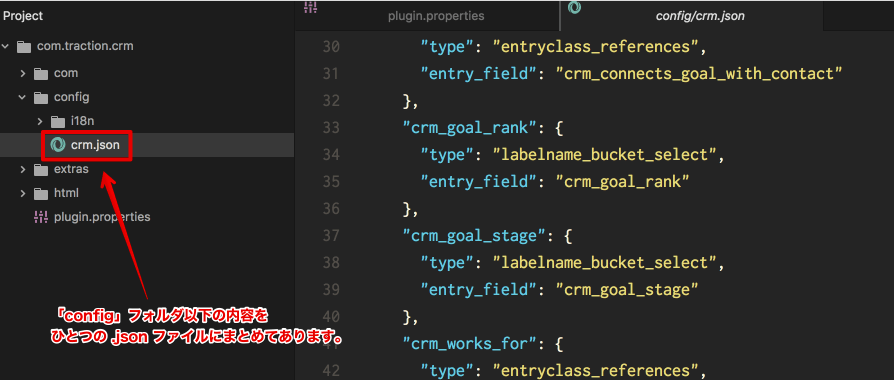
crm.json.png
image01.png
goal_info_table_1.png
form1.png
form2.png
info_table_after.png